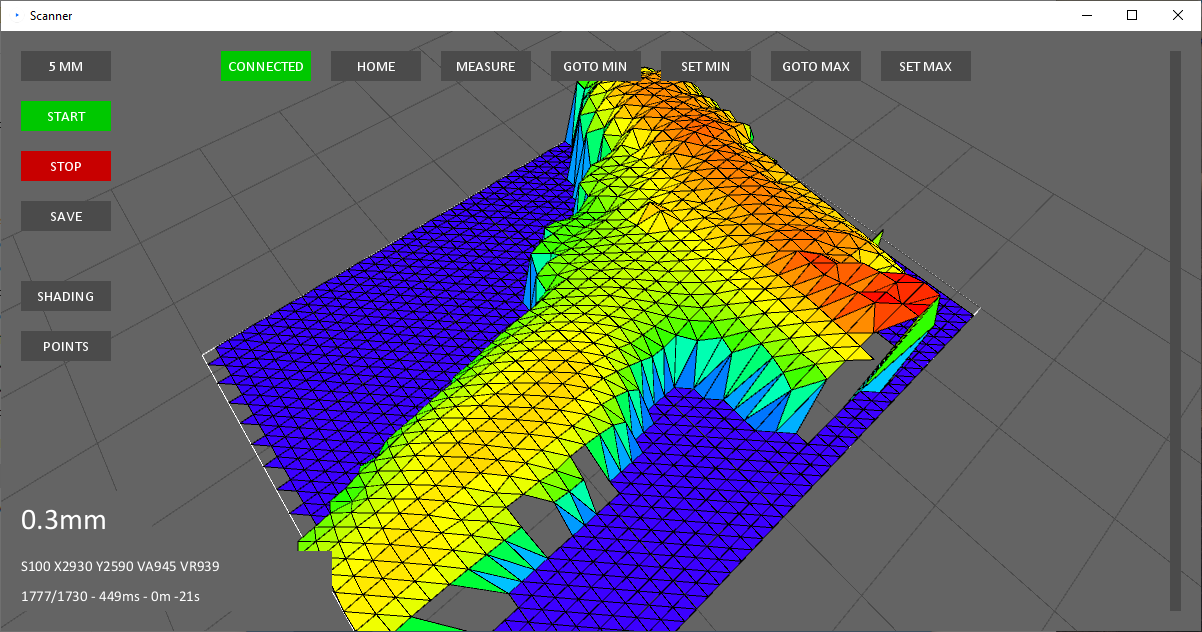
Category Archives: Software

Importing Lattice Type Geometry into Solidworks

I’ve been daydreaming about some 3D printing projects again and have spent some time looking at the lattice style structures that are used as low density volume fillers in SLA or SLS prints. I think this is an underappreciated area of printing because these structures can only be created practically by printing and there is likely some interesting strength and stiffness optimizations you can do by tinkering with the lattice geometry. I think this will become much more interesting as flexible material prints become more popular.


These lattice structures are pretty simple geometrically so in theory you could create them in Solidworks but in practice I think it would be tedious and a bit of a pain. The geometry should be easy to generate with a few lines of code so I thought it would be interesting to see if I could generate some geometry programmatically and then import it into Solidworks.  After doing some research I couldn’t find an existing method of doing this.  The closest thing was a few Solidworks macros to import point clouds.

I’ve found the Solidworks API and associated VBA difficult to work with in the past.  In theory I could generate all my geometry just using some VBA in a Solidworks macro but I think that would be an exercise in frustration for myself.

I decided to do most of the heavy lifting outside Solidworks and then write a macro to import the geometry and create some simple swept cylinder features to replicate my geometry.  I’ve done some 3D work in Processing before so I expected the geometry creation to be straightforward by reusing some existing code.

Here’s a quick overview of the plan I developed:

  1. Generate line geometry in Processing
  2. Export lines as pairs of 3D points and a diameter parameter
  3. Use a Soldiworks macro to create 3D sketches based on the points, then create a swept circular profile for each

Predictably the Solidworks macro was the most difficult part for myself.  It imports data from a text file with each line defined by Diameter, X1, Y1, Z1, X2, Y2, Z2.  It creates a 3D sketch, inserts a line, then performs a circular profile sweep (SW 2017 and later).  Overall it’s pretty crude.

The macro works OK but could use some improvement.  The swept cylinders end with flat surfaces which creates gaps at intersections.  Ideally each cylinder would have a spherical end to reduce gaps.

Each cylinder is created as a separate body by design.  This allows the lattice to be easily trimmed in Solidworks without leaving any weird partial bodies.

Overall this was a fun project.  I don’t have any immediate plans for this work but I think I’ll dust off this code in the future.  If this project interests you I would suggest that you don’t go into the deep end of programming complicated geometry. Mesh Mixer has a lot of high end tools for this type of work.

Here’s the macro code:

Dim swApp As Object
Sub main()

Set swApp = Application.SldWorks
Set Part = swApp.ActiveDoc

Dim x As Integer
x = 1
Dim sketch As String

‘open file
Open “lines.txt” For Input As #1
Do While Not EOF(1)
Input #1, D, X1, Y1, Z1, X2, Y2, Z2

‘create 3d sketch
Part.SketchManager.Insert3DSketch False
‘create line
Set skSegment = Part.SketchManager.CreateLine(X1 / 1000, Y1 / 1000, Z1 / 1000, X2 / 1000, Y2 / 1000, Z2 / 1000)
Part.SketchManager.Insert3DSketch False

‘select new line
sketch = “3DSketch” & x
boolstatus = Part.Extension.SelectByID2(sketch, “SKETCH”, 0, 0, 0, True, 4, Nothing, 0)
x = x + 1

‘create sweep
Dim myFeature As Object
Set myFeature = Part.FeatureManager.InsertProtrusionSwept4(False, False, 0, False, False, 0, 0, False, 0, 0, 0, 0, False, True, True, 0, True, True, D / 1000, False)

Loop
Close #1

Set swApp = Application.SldWorks
End Sub

Satellite Weather Bot

ABOUT

I’m a big fan of NOAA in general but I’ve fallen in love with the real time imagery available from their GOES-16 satellite.  Weather nerds are all over this stuff but I don’t think the general public has any idea this space imagery exists.

There are a few accessible points for the imagery, notably NOAA’s GOES site or the RAMMB SLIDER, but I wanted something that would make the imagery a little more immediate.    I decided a Twitter bot would be the perfect tool to create animated satellite loops and then push them out to be seen by the world.

Originally built for an audience of 1 (myself), I was free to experiment and tweak the outputs to my liking.  I focused on the north east US so I could have an hourly view of clouds in my area.

The bot has exceeded my expectations and it’s become a great tool that I check multiple times a day.  It’s a great for tracking weather patterns and storms but I really just love watching clouds.  I hope that this bot provides the same wonder and curiosity that it provides me.

Thanks to  NOAA and everyone involved with GOES!

FAQ

Q:  Can you cover different regions?
A: Probably, I’m considering expanding to cover new areas.  Message me on Twitter.

Q:  Why do you use the geocolor output?
A:  I think it’s visually the most appealing and I’m targeting a broad audience here, not just weather nerds.  I don’t like the geocolor night time output though.  If you really want a different band, message me on Twitter, I’m curious to hear what you want.

Q:  Why do your animated loops have low resolution?
A:  I think the resolution is a good compromise between usability and Twitter’s video compression.  It took some tweaking to get a good output, a really high quality output  will get heavily compressed by Twitter and result in a worse animation.

Q:  How did you choose the frequency and length of outputs?
A:  I wanted something that would provide an hourly picture of the weather and I also wanted something that would provide nice long loops so you could see how the weather changed over the course of a day.  The outputs try to address both goals but are still being tweaked.

Solidworks Icon

The Best Solidworks PC – 2018 Edition

Another year, another new Solidworks release.  Not too many new features this year on the software end but it’s worth taking a look at updated hardware for a new workstation.  Parts are cheaper, performance has increased, it may be the right time to update.

This article is a refresh from my workstation build last year.  Not a whole lot has changed regarding a workstation build but by now you should be on Windows 10 and be considering a ridiculous amount of RAM and a beefier CAD GPU.  Overall there have been minimal performance relevant changes in 2018 and most of the hardware remains the same.  Some parts are no longer readily available so I have recommended the best possible replacement.

The core of a good Solidworks workstation is still a fast CPU, lots of RAM, and a Solidworks approved workstation graphics card.  A thread on Reddit has a great breakdown on Solidworks performance and how component selection will improve performance.  The Solidworks blog has some additional coverage that confirms all of these points.

Solidworks performance is limited by the CPU and unfortunately only runs single-core for everything except simulation and rendering.  An Intel I7-7700 processor will provide good performance for the price even if you’re using only a single core on the chip.

16GB of RAM is a minimum and important for dealing with large assemblies.  This stuff is cheap and can easily be expanded in the future.

A basic CAD workstation graphics card should be sufficient and won’t hinder performance.  They key here is stability and performance with Solidworks which is why you want something like the newer Pascal architecture Quadro P4000.  Workstations graphics cards are essentially glorified gaming cards but they have extremely stable drivers.

Those are the important bits, the following list covers the complete build.  All components are from Amazon because they have fairly competitive prices and good customer service.  Shop around though, your experience may vary.

The system price at time of writing is is $1880.  Part prices are not listed here because they seem to change week to week.  Expect the system price to trend downward in the next few months.

Processor – Intel I7-700K – great performance for the price, LGA 1151 processor

Motherboard – MSI Pro Z270 – feature-rich motherboard to provide flexibility in the future, has a fancy BIOS and will support up to 32gb of RAM

Graphics Card – Quadro P4000 – pricey but you’re paying for stability here

Memory – Corsair 16GB – fast and cost effective

Storage – Samsung SSD 850 EVO-Series 1TB – a nice solid state drive for speedy performance, I think it’s important to stick with a name brand here to ensure good performance over the life of the drive

DVD –Asus DVD Optical Drive – sigh, can’t quite escape physical discs yet, I can’t tell you the number of times I get files mailed to me on a DVD.  With writing feature for all of your documentation purposes!

Case – Corsair Carbide Series 200R – a nice clean case that’s easy to work on

Power Supply – Rosewill 80 PLUS BRONZE 550W – Solid power supply with more than enough wattage, will support expansion in the future

OS – Windows 10 Pro OEM – The new supported standard, if you don’t upgrade now you may be forced into it soon

That’s everything you need for a complete build!  The case comes with all necessary hardware and fans, the power supply has all the cables, and the CPU has it’s own cooler and heatsink.

Need monitors?  I’m a big fan of the 24-inch Dell Ultrasharp because of the positioning flexibility.  It’s easy to setup your dual monitor view in any configuration.  Ergonomics are a big deal if you’re sitting in front of monitors for 8+ hours a day.

N64 on Android

It’s possible to play N64 games on any Android device.  In fact it’s easy.  It’s made possible by the magic of Android N64 emulation and Android’s extensive USB support that works with USB controllers.

To make it happen you’ll need:

  1. USB N64 controller
  2. USB adapter dongle
  3. N64 emulation app
  4. Your favorite N64 ROMs

It’s as easy as plugging in some cables.  I had to remap my controller buttons in the emulator to get started.  You can connect 4 controllers with a USB hub for some nostalgic multiplayer action.

List of Tomato Compatible Routers

This is a comprehensive list of routers that are compatible with Tomato firmware.  The two active communities supporting continuing work on Tomato firmware are Tomato by Shibby and AdvancedTomato.  Both are great and have passionate developers contributing to each mod.

I recently upgraded my router and I found it difficult to find a good router that was readily available, compatible with Tomato, and had the features I needed.  I decided to make a list of all of the Tomato compatible routers, their features, and the firmwares they are compatible with.  I thought this would be helpful for anyone looking for a Tomato router.

Many of these routers are very similar in features and many of the older versions are no longer available.  Shibby supports a lot of routers! A word of caution, many of these routers have different hardware versions and some are not compatible with specific Tomato builds.  Before you buy make sure you double-check the build compatibility!

I was interested in a recent mid-range router that had dual band coverage, a fast processor, and Gigabit LAN ports.  A fast processor is handy when using the router for VPN tunneling, often the processor speed will be the bottleneck for traffic.  I settled on the Asus RT-AC68U but a few routers will fit the bill.

I would also recommend the Linksys EA6900 and Netgear R6400.

List of Tomato Routers

Router Band CPU (MHz) LAN Speed Shibby Advanced Tomato
Asus RT-N10 300 100 Mbps Shibby
Asus RT-N10P 300 100 Mbps Shibby
Asus RT-N10U Single 300 100 Mbps Shibby Advanced Tomato
Asus RT-N12 300 100 Mbps Shibby
Asus RT-N15U 500 1 Gbps Shibby
Asus RT-N16 Single 480 1 Gbps Shibby Advanced Tomato
Asus RT-N18U Single 800 1 Gbps Shibby Advanced Tomato
Asus RT-N53 Dual 300 100 Mbps Shibby Advanced Tomato
Asus RT-N66U Dual 600 1 Gbps Shibby Advanced Tomato
Asus RT-AC56U Dual 2x 800 1 Gbps Shibby Advanced Tomato
Asus RT-AC66U Dual 600 1 Gbps Shibby Advanced Tomato
Asus RT-AC68U/R Dual 2x 800 1 Gbps Shibby Advanced Tomato
Asus RT-AC3200 Dual 2x 1000 1 Gbps Shibby
Asus WL-330gE 240 100 Mbps Shibby
Asus WL500GP 240 100 Mbps Shibby
Asus WL500W 264 100 Mbps Shibby
Asus WL520GU 240 100 Mbps Shibby
Buffalo WHR-G54S 200 100 Mbps Shibby
Buffalo WHR-G125 240 100 Mbps Shibby
Buffalo WHR-HP-G54 200 100 Mbps Shibby
Cisco M10 v2 100 Mbps Shibby
D-Link DIR-320 240 100 Mbps Shibby
D-Link DIR-620 C1 530 100 Mbps Shibby
D-Link DIR-868L Dual 2x 800 1 Gbps Shibby Advanced Tomato
Fiboom HG320 533 100 Mbps Shibby
Huawei WS880 Dual 2x 800 1 Gbps Shibby Advanced Tomato
Linksys E800 300 100 Mbps Shibby
Linksys E900 300 100 Mbps Shibby
Linksys E1000 300 100 Mbps Shibby
Linksys E1200 300 100 Mbps Shibby
Linksys E1500 300 100 Mbps Shibby
Linksys E1550 Single 300 100 Mbps Shibby Advanced Tomato
Linksys E2000 354 1 Gbps Shibby
Linksys E2500 Dual 300 100 Mbps Shibby Advanced Tomato
Linksys E3000 480 1 Gbps Shibby
Linksys E3200 Dual 500 1 Gbps Shibby Advanced Tomato
Linksys E4200 Dual 480 1 Gbps Shibby Advanced Tomato
Linksys WRT160N 300 100 Mbps Shibby
Linksys WRT300N 264 100 Mbps Shibby
Linksys WRT310N 300 1 Gbps Shibby
Linksys WRT320N 354 1 Gbps Shibby
Linksys WRT54G 240 100 Mbps Shibby
Linksys WRT610N 480 1 Gbps Shibby
Linksys WRTSL54GS 266 100 Mbps Shibby
Linksys EA6500 Dual 2x 800 1 Gbps Shibby Advanced Tomato
Linksys EA6700 Dual 2x 800 1 Gbps Shibby Advanced Tomato
Linksys EA6900 2x 800 1 Gbps Shibby
Netgear WNR2000 300 100 Mbps Shibby
Netgear WNR3500L Dual 500 1 Gbps Shibby Advanced Tomato
Netgear R6250 Dual 2x 800 1 Gbps Shibby Advanced Tomato
Netgear R6300 Dual 2x 800 1 Gbps Shibby Advanced Tomato
Netgear R6400 Dual 2x 800 1 Gbps Shibby Advanced Tomato
Netgear R7000 Dual 2x 1000 1 Gbps Shibby Advanced Tomato
Netgear R8000 Dual 2x 1000 1 Gbps Shibby
Ovislink WL1600GL 240 100 Mbps Shibby
Tenda N6 Dual 300 100 Mbps Shibby Advanced Tomato
Tenda N60 Dual 500 1 Gbps Shibby Advanced Tomato
Tenda W1800R Dual 600 1 Gbps Shibby Advanced Tomato
ZTE ZXV10 H618B 240 100 Mbps Shibby
ZTE H218N 500 1 Gbps Shibby
Solidworks Icon

The Best Solidworks PC – 2017 Edition

EDIT: This article has been updated in Building a Solidworks PC – 2018 Edition

Dassault has shuffled out another release of Solidworks.  I have become pessimistic with upgrades and none of the new 2017 features seem to be game changers.  Maybe something clever will warm my crusty engineer heart.

This article is a refresh from my workstation build last year.  Not a whole lot has changed regarding a workstation build but by now you should be on Windows 10 and be considering a ridiculous amount of RAM and a beefier CAD GPU.  Overall there have been minimal performance relevant changes in 2017 and most of the hardware remains the same.

The core of a good Solidworks workstation is still a fast CPU, lots of RAM, and a Solidworks approved workstation graphics card.  A thread on Reddit has a great breakdown on Solidworks performance and how component selection will improve performance.

Solidworks performance is limited by the CPU and unfortunately only runs single-core for everything except simulation and rendering.  An Intel I7-6700 processor will provide good performance for the price even if you’re using only a single core on the chip.

16GB of RAM is a minimum and important for dealing with large assemblies.  This stuff is cheap and can easily be expanded in the future.

A basic CAD workstation graphics card should be sufficient and won’t hinder performance.  They key here is stability and performance with Solidworks which is why you want something like the Quadro K4000.  Workstations graphics cards are essentially glorified gaming cards but they have extremely stable drivers.

Those are the important bits, the following list covers the complete build.  All components are from Amazon because they have fairly competitive prices and good customer service.  Shop around though, your experience may vary.

The system price at time of writing is is $1880.  Part prices are not listed here because they seem to change week to week.  Expect the system price to trend downward in the next few months.

Processor – Intel I7-6700K – great performance for the price, LGA 1151 processor

Motherboard – MSI Z97 LGA – feature-rich motherboard to provide flexibility in the future, has a fancy BIOS and will support up to 32gb of RAM

Graphics CardQuadro K4000 – pricey but you’re paying for stability here

Memory – Kingston 16GB – fast and cost effective

Storage – Samsung SSD 850 EVO-Series 1TB – a nice solid state drive for speedy performance, I think it’s important to stick with a name brand here to ensure good performance over the life of the drive

DVD LG Electronics Super Multi Drive – sigh, can’t quite escape physical discs yet, I can’t tell you the number of times I get files mailed to me on a DVD.  With writing feature for all of your documentation purposes!

Case – Corsair Carbide Series 200R – a nice clean case that’s easy to work on

Power Supply – Rosewill 80 PLUS BRONZE 550W – Solid power supply with more than enough wattage, will support expansion in the future

OS Windows 10 Pro OEM – The new supported standard, if you don’t upgrade now you may be forced into it soon

That’s everything you need for a complete build!  The case comes with all necessary hardware and fans, the power supply has all the cables, and the CPU has it’s own cooler and heatsink.

Need monitors?  I’m a big fan of the 24-inch Dell Ultrasharp because of the positioning flexibility.  It’s easy to setup your dual monitor view in any configuration.  Ergonomics are a big deal if you’re sitting in front of monitors for 8+ hours a day.

Solidworks in 4K

I was recently awarded with a pair of 4K Acer B286HK monitors at work for my Solidworks workstation.  I was told there was an ordering mix up and they couldn’t be returned.  Not sure if that was the complete story but I was not going to complain.

Right off the bat, Solidworks looks great in 4K.  Assemblies look crisp and detailed, drawings appear sharp with annotations and dimensions crystal clear.  It took a few days to adjust to a higher DPI and I ended up making a few tweaks along the road to reduce eyestrain.  I wanted to share what I had learned to make things easier for other users going through the same transition.

First, adjust global scaling for Windows.  This seems like a necessity for all 4K monitors.  The actual text scale without increased scaling is a recipe for headaches and eye strain.  I settled on 175% after experimenting with a few different scale factors.  You can adjust this in Windows Display Settings – make sure you restart Windows afterwords.  This scaling adjusts text and program scaling globally but there are some strange scaling issues when programs don’t follow Window’s lead.

4K Display Scaling


Second, scale your Solidworks icons to make them usable.  I am a fan of the tiny icons without text but there’s a limit to how small I will go.  The adjustment for this is right at the top of the screen in Solidworks.

4K Solidworks Icon


Third, make sure both of your monitors are running at the same resolution.  The DisplayPort cables included with the new monitors were on the short side and one of the cables couldn’t reach from my desk to my tower on the floor.  For a week I was running the second monitor with a DVI cable and could only display a 1080p image through the cable.  The consequence was terrible graphics glitches in Solidworks due to the resolution mismatch.  My Solidworks viewport would flicker and have strange image buffer artifacts.

Lastly, buy longer DisplayPort cables ahead of time and avoid issue number three.


Building a Solidworks PC – 2016 Edition

Solidworks Icon

EDIT: This article has been updated in Building a Solidworks PC – 2017 Edition

Another year, another release of Solidworks.  2016 will bring a mix of incremental upgrades (an updated move triad!) and a few new features. This article is an update from my workstation build last year.  Not a whole lot has changed regarding a workstation build but it’s time to start considering Windows 10 and a beefier CAD GPU.  Overall there have been minimal performance relevant changes in 2016 and most of the hardware remains the same.

The core of a good Solidworks workstation is still a fast CPU, lots of RAM, and a Solidworks approved workstation graphics card.

Solidworks performance is limited by the CPU and unfortunately only runs single-core for everything except simulation and rendering.  An Intel i7-4770 processor will provide good performance for the price even if you’re using only a single core on the chip.

16GB of RAM is a minimum and important for dealing with large assemblies.  This stuff is cheap and can easily be expanded in the future.

A basic CAD workstation graphics card should be sufficient and won’t hinder performance.  They key here is stability and performance with Solidworks which is why you want something like the Quadro K4000.  Workstations graphics cards are essentially glorified gaming cards but they have extremely stable drivers.

Those are the important bits, the following list covers the complete build.  All components are from Amazon because they have fairly competitive prices and good customer service.  Shop around though, your experience may vary.

The system price at time of writing is is $1880.  Part prices are not listed here because they seem to change week to week.  Expect the system price to trend downward in the next few months.

Processor – Intel i7-4770 – good performance for the price

Motherboard – MSI Z97 PC Mate LGA – feature-rich motherboard to provide flexibility in the future, has a fancy BIOS and will support up to 32gb of RAM

Graphics CardQuadro K4000 – you’re paying for stability here

Memory – Kingston 16GB – fast and cost effective

Storage – Samsung SSD 840 EVO-Series 500GB – a nice solid state drive for speedy performance, I think it’s important to stick with a name brand here to ensure good performance over the life of the drive

DVD LG Electronics 24X – sigh, can’t quite escape physical discs yet.  With writing feature for all of your documentation purposes.

Case – Corsair Carbide Series 200R – a nice clean case that’s easy to work on

Power Supply – Rosewill 80 PLUS BRONZE 550W – Solid power supply with more than enough wattage, will support expansion in the future

OS Windows 10 Pro OEM – The new supported standard, if you don’t upgrade now you may be forced into it soon

That’s everything you need for a complete build!  The case comes with all necessary hardware and fans, the power supply has all the cables, and the CPU has it’s own cooler and heatsink.

Need monitors?  I’m a big fan of the 24-inch Dell Ultrasharp because of the positioning flexibility.  It’s easy to setup your dual monitor view in any configuration.  Ergonomics are a big deal if you’re sitting in front of monitors for 8+ hours a day.

Viewing CAD files in VR

vr

Virtual reality has suddenly arrived. Headsets such as the Oculus Rift and Valve Vive are near a consumer release and offer immersive VR experiences. While most of the hype has been surrounding VR video games there is a huge market for VR visualization of 3D CAD files. Conceptual factory layouts, machine assemblies, and architectural plans can all be visualized in VR prior to release.

Engineers and designers can use VR to evaluate the human interaction and ergonomics of conceptual designs. VR will be an excellent sales tool by allowing potential customers to visualize the scale and impact of a final design, something especially important in architecture.

Currently there is no native VR support for any of the major CAD packages but there is a simple workaround for viewing any CAD data in VR. While most native solid CAD files are almost impossible to interchange, generic 3D files like STEP can be opened by almost any 3D modeling program.

Video game engine packages such as Unity and Unreal are free to download and use and offer direct Rift and Vive support. You can use these packages as glorified model viewers by importing generic 3D files and using their direct VR viewing mode.

Here’s what the workflow looks like:

Native: Solidworks, CATIA, Inventor, Sketchup

Save as intermediate: .STP, .3DS, .STL, 3D .DXF

Import into VR Environment: Unity, Unreal

This workflow can export Solidworks, Inventor, CATIA, and SketchUp files to the Oculus or Vive. There are multiple intermediate formats to exchange the data, some experimentation may be necessary to find the best one for your CAD package. If you can’t find a direct exchange format you may have to use another 3D modeling package, such as Blender, as an intermediate. Blender has a ton of export formats including .obj and .fbx

Building a Solidworks PC – 2015 Edition

EDIT: This article has been updated in Building a Solidworks PC – 2017 Edition

The core of a good Solidworks workstation should be a fast CPU, lots of RAM, and a Solidworks approved workstation graphics card.

Solidworks performance is limited by the CPU and unfortunately only runs single-core for everything except simulation and rendering.  An Intel i7-4770 processor will provide good performance for the price even if you’re using only a single core on the chip.

16GB of RAM is a minimum and important for dealing with large assemblies.  This stuff is cheap and can easily be expanded in the future.

A basic CAD workstation graphics card should be sufficient and won’t hinder performance.  They key here is stability and performance with Solidworks which is why you want something like the Quadro K2000.  Workstations graphics cards are essentially glorified gaming cards but they have extremely stable drivers.

Those are the important bits, the following list covers the complete build.  All components are from Amazon because they have fairly competitive prices and good customer service.  Shop around though, your experience may vary.

The system price at time of writing is is $1495.  Part prices are not listed here because they seem to change week to week.  Expect the system price to trend downward in the next few months.

Processor – Intel i7-4770 – good performance for the price

Motherboard – MSI Z97 PC Mate LGA – feature-rich motherboard to provide flexibility in the future, has a fancy BIOS and will support up to 32gb of RAM

Graphics CardQuadro K2000 – you’re paying for stability here

Memory – Kingston 16GB – fast and cost effective

Storage – Samsung SSD 840 EVO-Series 500GB – a nice solid state drive for speedy performance, I think it’s important to stick with a name brand here to ensure good performance over the life of the drive

DVD LG Electronics 24X – sigh, can’t quite escape physical discs yet.  With writing feature for all of your documentation purposes.

Case – Corsair Carbide Series 200R – a nice clean case that’s easy to work on

Power Supply – Rosewill 80 PLUS BRONZE 550W – Solid power supply with more than enough wattage, will support expansion in the future

OS Windows 7 64-bit OEM – The old standard here, I prefer it over Windows 8

That’s everything you need for a complete build!  The case comes with all necessary hardware and fans, the power supply has all the cables, and the CPU has it’s own cooler and heatsink.

Need monitors?  I’m a big fan of the 24-inch Dell Ultrasharp because of the positioning flexibility.  It’s easy to setup your dual monitor view in any configuration.  Ergonomics are a big deal if you’re sitting in front of monitors for 8+ hours a day.